> ## Documentation Index
> Fetch the complete documentation index at: https://dripart-docs-robin-i18n-sync.mintlify.site/llms.txt
> Use this file to discover all available pages before exploring further.
# ComfyUI Flux.1 fill dev 示例
> 本文将使用Flux.1 fill dev 来完成 Inpainting 和 Outpainting 的工作流示例。
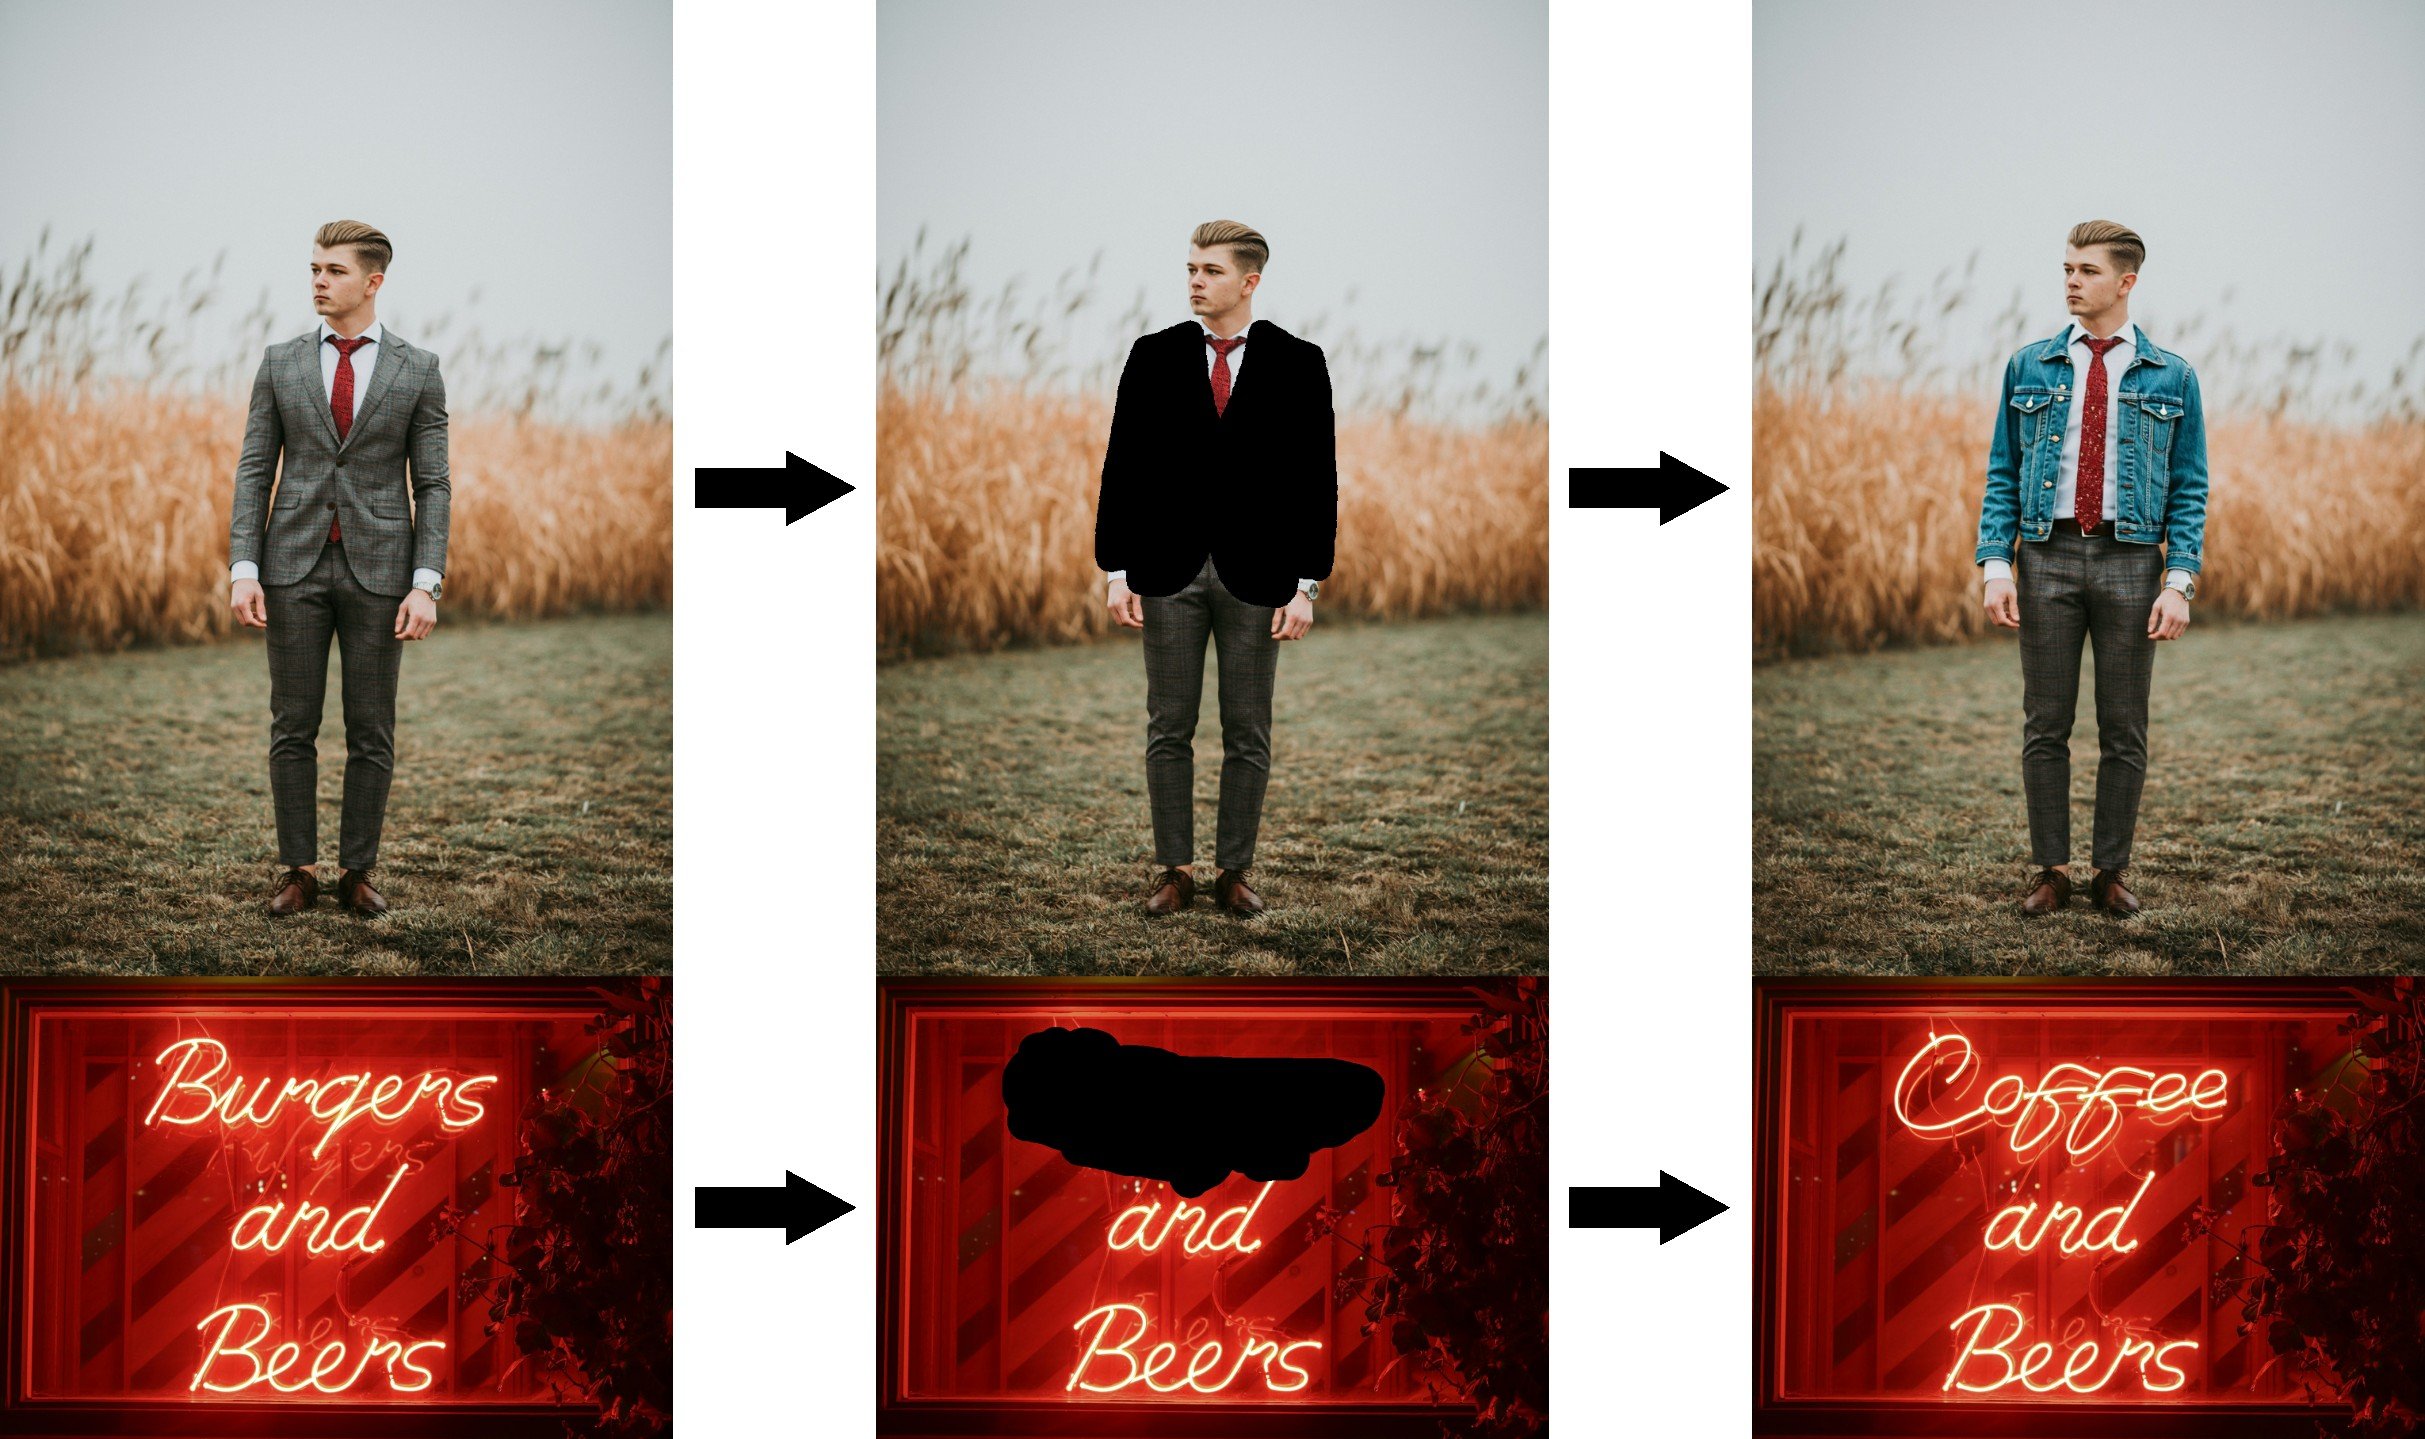 ## Flux.1 fill dev 模型介绍
Flux.1 fill dev 是 [Black Forest Labs](https://blackforestlabs.ai/) 推出的 [FLUX.1 Tools 套件](https://blackforestlabs.ai/flux-1-tools/) 中的核心工具之一,专为图像修复和扩展设计。
Flux.1 fill dev 的核心特点:
* 强大的图像重绘(Inpainting)和扩绘(Outpainting)能力,生成效果仅次于商业版的 FLUX.1 Fill \[pro]。
* 出色的提示词理解和跟随能力,能够精确捕捉用户意图并与原图保持高度一致性。
* 采用先进的引导蒸馏训练技术,使模型在保持高质量输出的同时更加高效。
* 友好的许可条款,生成的输出可用于个人、科学和商业目的,具体请参见 [FLUX.1 \[dev\] 非商业许可证](https://huggingface.co/black-forest-labs/FLUX.1-dev/blob/main/LICENSE.md)。
模型开源地址:[FLUX.1 \[dev\]](https://huggingface.co/black-forest-labs/FLUX.1-dev)
本文将基于 Flux.1 fill dev 模型来完成 Inpainting 和 Outpainting 的工作流,
如果你不太了解 Inpainting 和 Outpainting 的工作流可以参考 [ComfyUI 布局重绘示例](/zh/tutorials/basic/inpaint) 和 [ComfyUI 扩图示例](/zh/tutorials/basic/outpaint),部分的相关说明。
## Flux.1 Fill dev 工作流模型安装
在开始之前,让我们先完成 Flux.1 Fill dev 模型文件的安装, inpainting 和 outpainting 的工作流中会使用完全相同的模型文件,如果你之前使用过完整版本的 [Flux.1 文生图工作流](/zh/tutorials/flux/flux-1-text-to-image),那么在这个部分你仅需要下载 **flux1-fill-dev.safetensors** 这个模型文件。
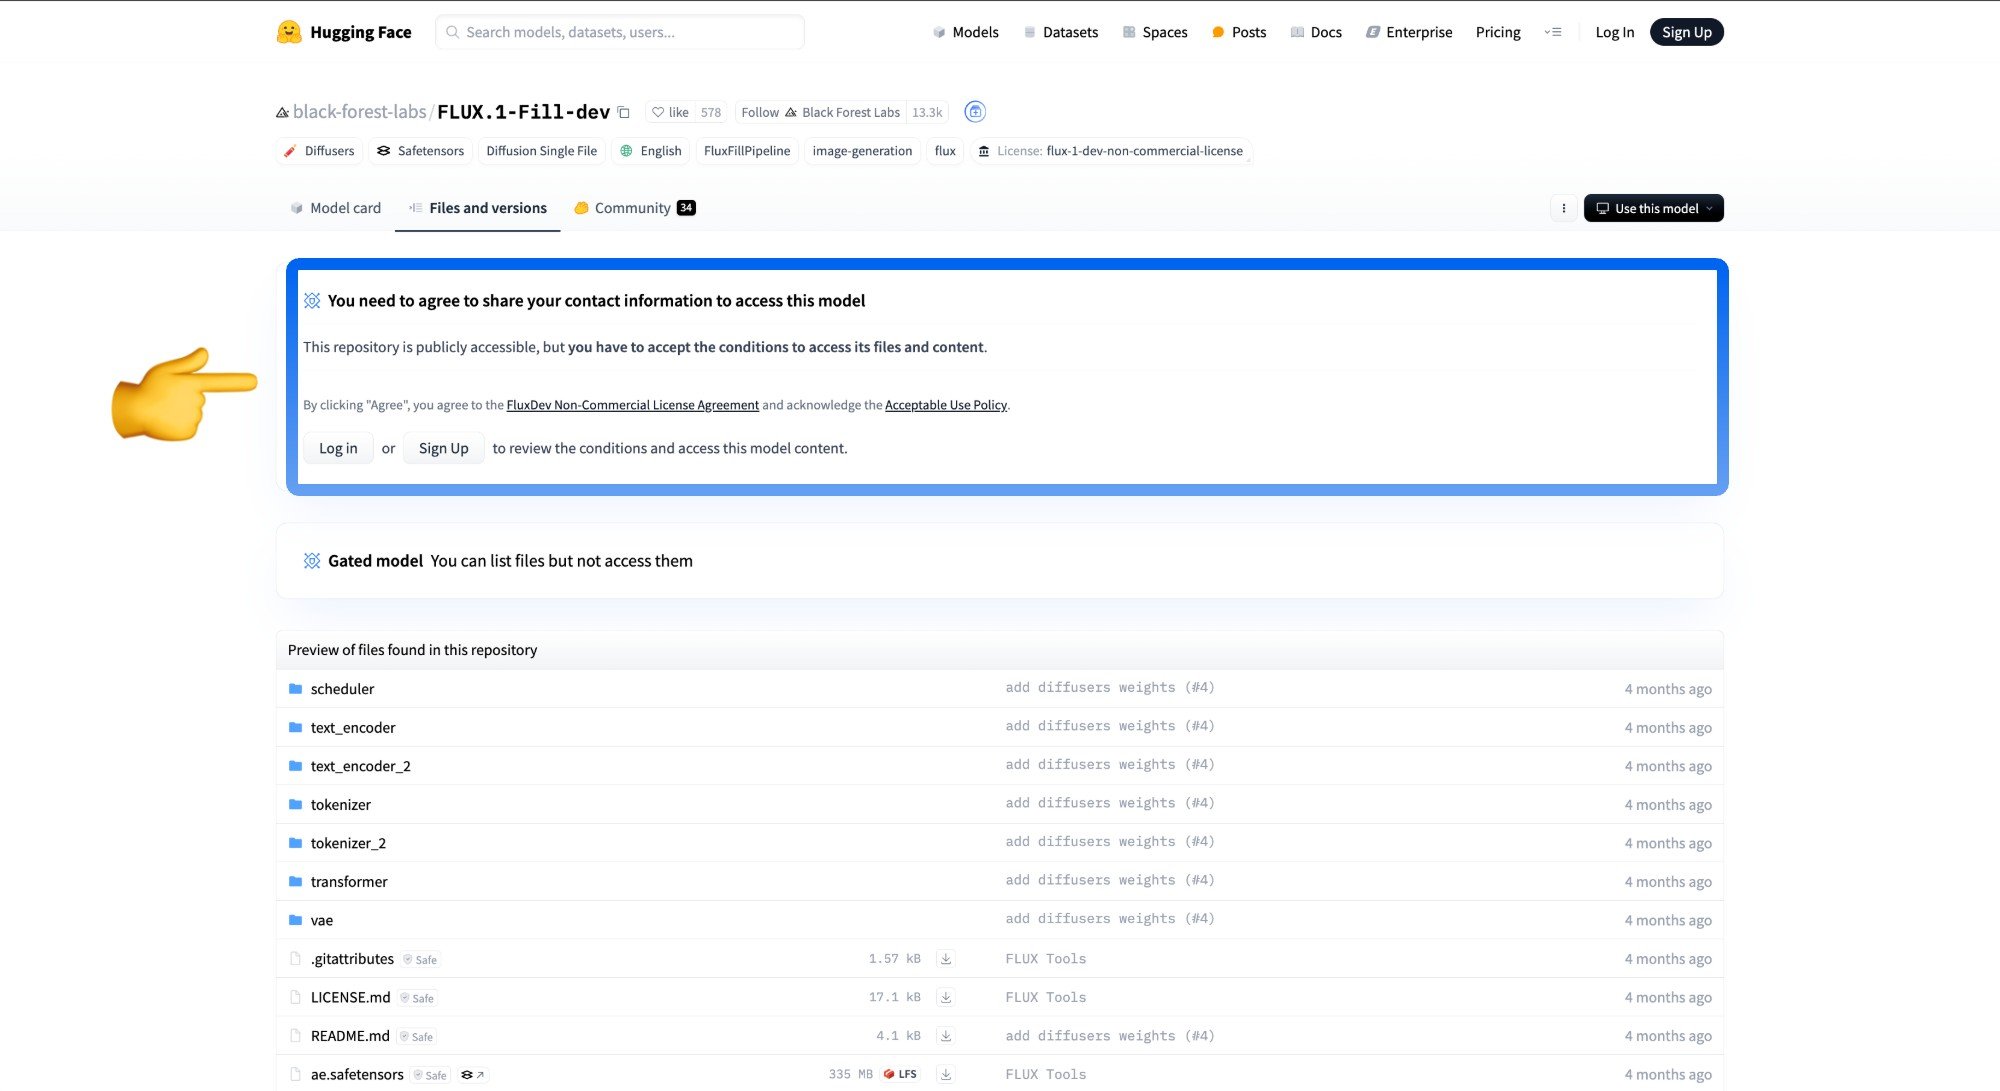
不过由于下载对应模型需要同意对应的使用协议,所以请访问 [black-forest-labs/FLUX.1-Fill-dev](https://huggingface.co/black-forest-labs/FLUX.1-Fill-dev)页面,确保你参照下图同意了对应的协议。
## Flux.1 fill dev 模型介绍
Flux.1 fill dev 是 [Black Forest Labs](https://blackforestlabs.ai/) 推出的 [FLUX.1 Tools 套件](https://blackforestlabs.ai/flux-1-tools/) 中的核心工具之一,专为图像修复和扩展设计。
Flux.1 fill dev 的核心特点:
* 强大的图像重绘(Inpainting)和扩绘(Outpainting)能力,生成效果仅次于商业版的 FLUX.1 Fill \[pro]。
* 出色的提示词理解和跟随能力,能够精确捕捉用户意图并与原图保持高度一致性。
* 采用先进的引导蒸馏训练技术,使模型在保持高质量输出的同时更加高效。
* 友好的许可条款,生成的输出可用于个人、科学和商业目的,具体请参见 [FLUX.1 \[dev\] 非商业许可证](https://huggingface.co/black-forest-labs/FLUX.1-dev/blob/main/LICENSE.md)。
模型开源地址:[FLUX.1 \[dev\]](https://huggingface.co/black-forest-labs/FLUX.1-dev)
本文将基于 Flux.1 fill dev 模型来完成 Inpainting 和 Outpainting 的工作流,
如果你不太了解 Inpainting 和 Outpainting 的工作流可以参考 [ComfyUI 布局重绘示例](/zh/tutorials/basic/inpaint) 和 [ComfyUI 扩图示例](/zh/tutorials/basic/outpaint),部分的相关说明。
## Flux.1 Fill dev 工作流模型安装
在开始之前,让我们先完成 Flux.1 Fill dev 模型文件的安装, inpainting 和 outpainting 的工作流中会使用完全相同的模型文件,如果你之前使用过完整版本的 [Flux.1 文生图工作流](/zh/tutorials/flux/flux-1-text-to-image),那么在这个部分你仅需要下载 **flux1-fill-dev.safetensors** 这个模型文件。
不过由于下载对应模型需要同意对应的使用协议,所以请访问 [black-forest-labs/FLUX.1-Fill-dev](https://huggingface.co/black-forest-labs/FLUX.1-Fill-dev)页面,确保你参照下图同意了对应的协议。
 完整模型列表:
* [clip\_l.safetensors](https://huggingface.co/comfyanonymous/flux_text_encoders/resolve/main/clip_l.safetensors?download=true)
* [t5xxl\_fp16.safetensors](https://huggingface.co/comfyanonymous/flux_text_encoders/resolve/main/t5xxl_fp16.safetensors?download=true)
* [ae.safetensors](https://huggingface.co/black-forest-labs/FLUX.1-schnell/resolve/main/ae.safetensors?download=true)
* [flux1-fill-dev.safetensors](https://huggingface.co/black-forest-labs/FLUX.1-Fill-dev/resolve/main/flux1-fill-dev.safetensors?download=true)
文件保存位置:
```
ComfyUI/
├── models/
│ ├── text_encoders/
│ │ ├── clip_l.safetensors
│ │ └── t5xxl_fp16.safetensors
│ ├── vae/
│ │ └── ae.safetensors
│ └── diffusion_models/
│ └── flux1-fill-dev.safetensors
```
## Flux.1 Fill dev inpainting 工作流
完整模型列表:
* [clip\_l.safetensors](https://huggingface.co/comfyanonymous/flux_text_encoders/resolve/main/clip_l.safetensors?download=true)
* [t5xxl\_fp16.safetensors](https://huggingface.co/comfyanonymous/flux_text_encoders/resolve/main/t5xxl_fp16.safetensors?download=true)
* [ae.safetensors](https://huggingface.co/black-forest-labs/FLUX.1-schnell/resolve/main/ae.safetensors?download=true)
* [flux1-fill-dev.safetensors](https://huggingface.co/black-forest-labs/FLUX.1-Fill-dev/resolve/main/flux1-fill-dev.safetensors?download=true)
文件保存位置:
```
ComfyUI/
├── models/
│ ├── text_encoders/
│ │ ├── clip_l.safetensors
│ │ └── t5xxl_fp16.safetensors
│ ├── vae/
│ │ └── ae.safetensors
│ └── diffusion_models/
│ └── flux1-fill-dev.safetensors
```
## Flux.1 Fill dev inpainting 工作流
Flux.1 Inpaint
使用 Flux.1 Fill Inpainting 填充图像缺失的部分。
 在 Comfy Cloud 中打开
下载 JSON,或在模板库中搜索 "Flux.1 Inpaint"
**输入素材**
将此文件上传到对应的 `LoadImage` 节点:
`LoadImage` 节点 17 · `flux_fill_inpaint_example_input_image.png`
**示例输出**
### 1. Inpainting 工作流与素材
对应的图像已经包含 alpha 通道,所以你不需要单独绘制遮罩。
如果你想自行绘制遮罩,请[点击这里](https://raw.githubusercontent.com/Comfy-Org/example_workflows/main/flux/inpaint/flux_fill_inpaint_input_original.png)获取不带遮罩的图像,并参阅 [ComfyUI 布局重绘示例](/zh/tutorials/basic/inpaint#使用遮罩编辑器) 中的 MaskEditor 使用部分,了解如何在 `Load Image` 节点中绘制遮罩。
### 2. 运行工作流的步骤
在 Comfy Cloud 中打开
下载 JSON,或在模板库中搜索 "Flux.1 Inpaint"
**输入素材**
将此文件上传到对应的 `LoadImage` 节点:
`LoadImage` 节点 17 · `flux_fill_inpaint_example_input_image.png`
**示例输出**
### 1. Inpainting 工作流与素材
对应的图像已经包含 alpha 通道,所以你不需要单独绘制遮罩。
如果你想自行绘制遮罩,请[点击这里](https://raw.githubusercontent.com/Comfy-Org/example_workflows/main/flux/inpaint/flux_fill_inpaint_input_original.png)获取不带遮罩的图像,并参阅 [ComfyUI 布局重绘示例](/zh/tutorials/basic/inpaint#使用遮罩编辑器) 中的 MaskEditor 使用部分,了解如何在 `Load Image` 节点中绘制遮罩。
### 2. 运行工作流的步骤
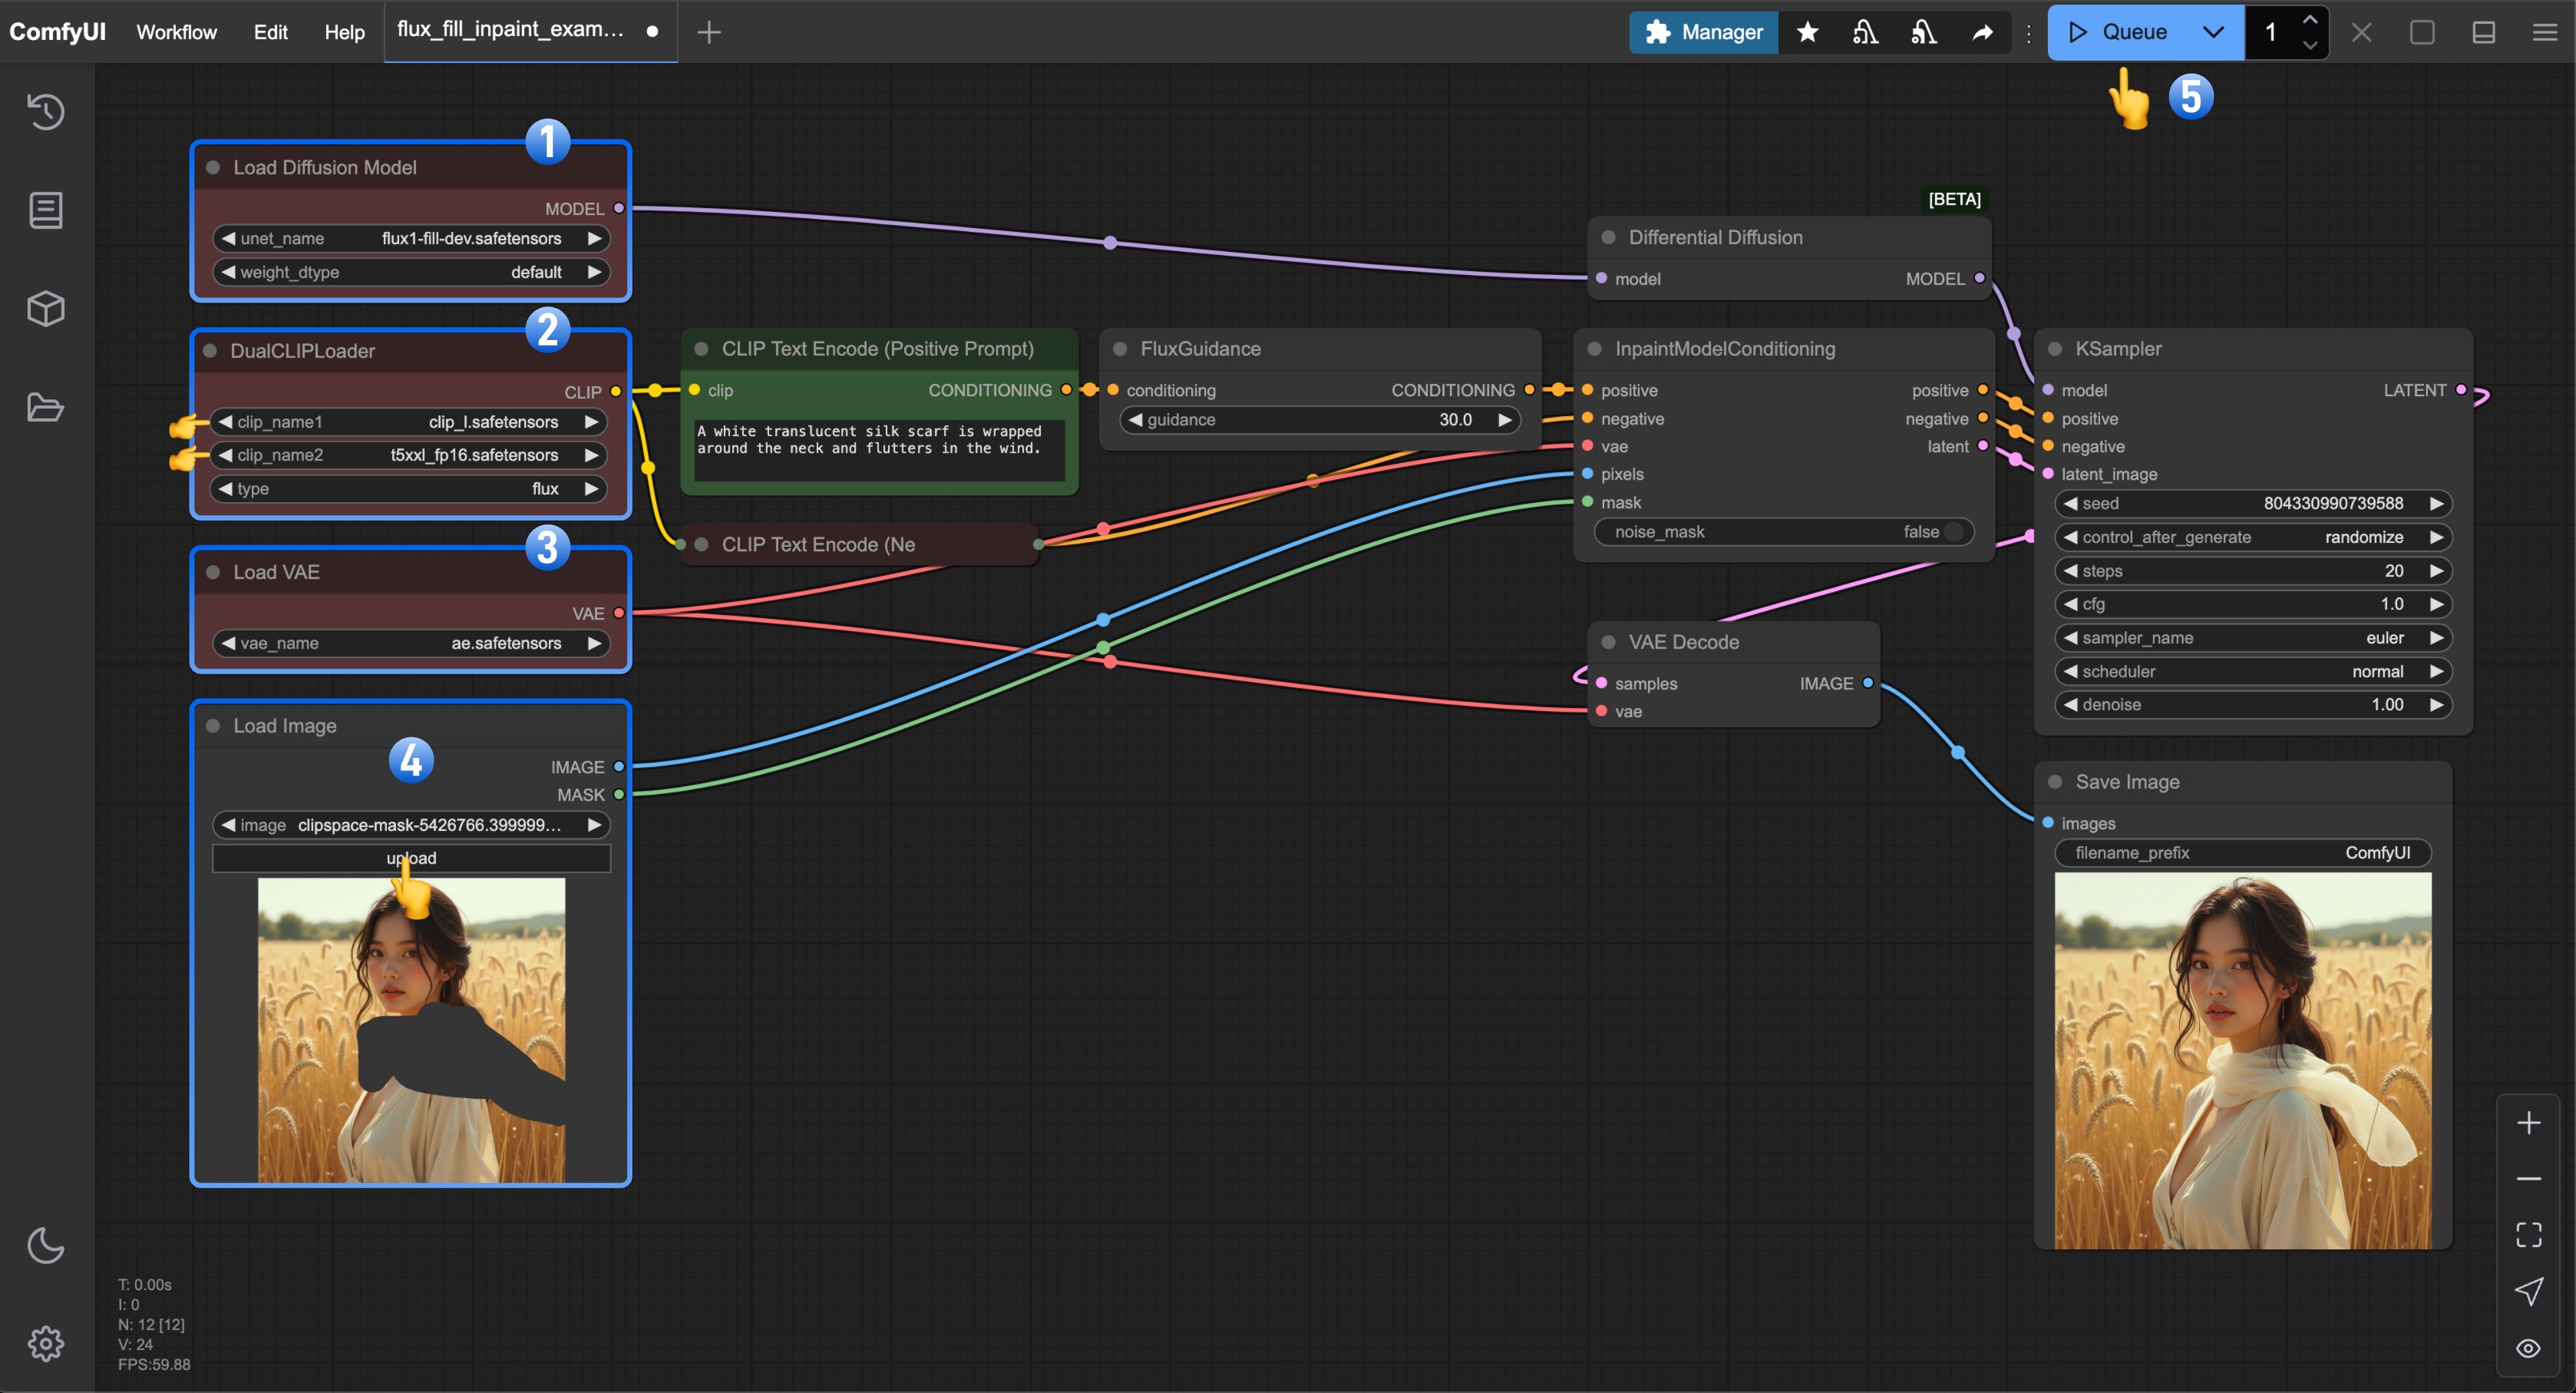 1. 确保 `Load Diffusion Model` 节点已加载 `flux1-fill-dev.safetensors`。
2. 确保 `DualCLIPLoader` 节点已加载以下模型:
* clip\_name1: `t5xxl_fp16.safetensors`
* clip\_name2: `clip_l.safetensors`
3. 确保 `Load VAE` 节点已加载 `ae.safetensors`。
4. 在 `Load Image` 节点中上传文档中提供的输入图像;如果你使用的是不带遮罩的版本,请记得使用遮罩编辑器完成遮罩绘制。
5. 点击 `Queue` 按钮,或使用快捷键 `Ctrl(cmd) + Enter` 运行工作流。
## Flux.1 Fill dev Outpainting 工作流
1. 确保 `Load Diffusion Model` 节点已加载 `flux1-fill-dev.safetensors`。
2. 确保 `DualCLIPLoader` 节点已加载以下模型:
* clip\_name1: `t5xxl_fp16.safetensors`
* clip\_name2: `clip_l.safetensors`
3. 确保 `Load VAE` 节点已加载 `ae.safetensors`。
4. 在 `Load Image` 节点中上传文档中提供的输入图像;如果你使用的是不带遮罩的版本,请记得使用遮罩编辑器完成遮罩绘制。
5. 点击 `Queue` 按钮,或使用快捷键 `Ctrl(cmd) + Enter` 运行工作流。
## Flux.1 Fill dev Outpainting 工作流
Flux.1 Outpaint
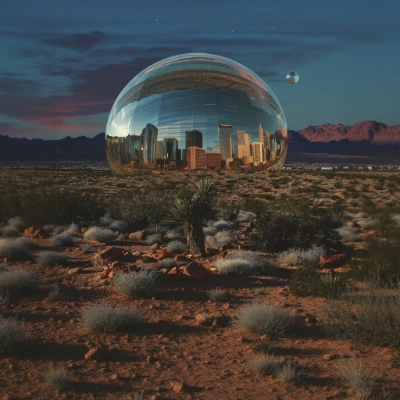
使用 Flux.1 Outpainting 将图像扩展到原始边界之外。
 在 Comfy Cloud 中打开
下载 JSON,或在模板库中搜索“Flux.1 Outpaint”
**输入素材**
将以下文件上传到对应的 `LoadImage` 节点:
`LoadImage` 节点 17 · `flux_fill_outpaint_example_input_image.png`
### 1. Outpainting 工作流与素材
### 2. 运行工作流的步骤
在 Comfy Cloud 中打开
下载 JSON,或在模板库中搜索“Flux.1 Outpaint”
**输入素材**
将以下文件上传到对应的 `LoadImage` 节点:
`LoadImage` 节点 17 · `flux_fill_outpaint_example_input_image.png`
### 1. Outpainting 工作流与素材
### 2. 运行工作流的步骤
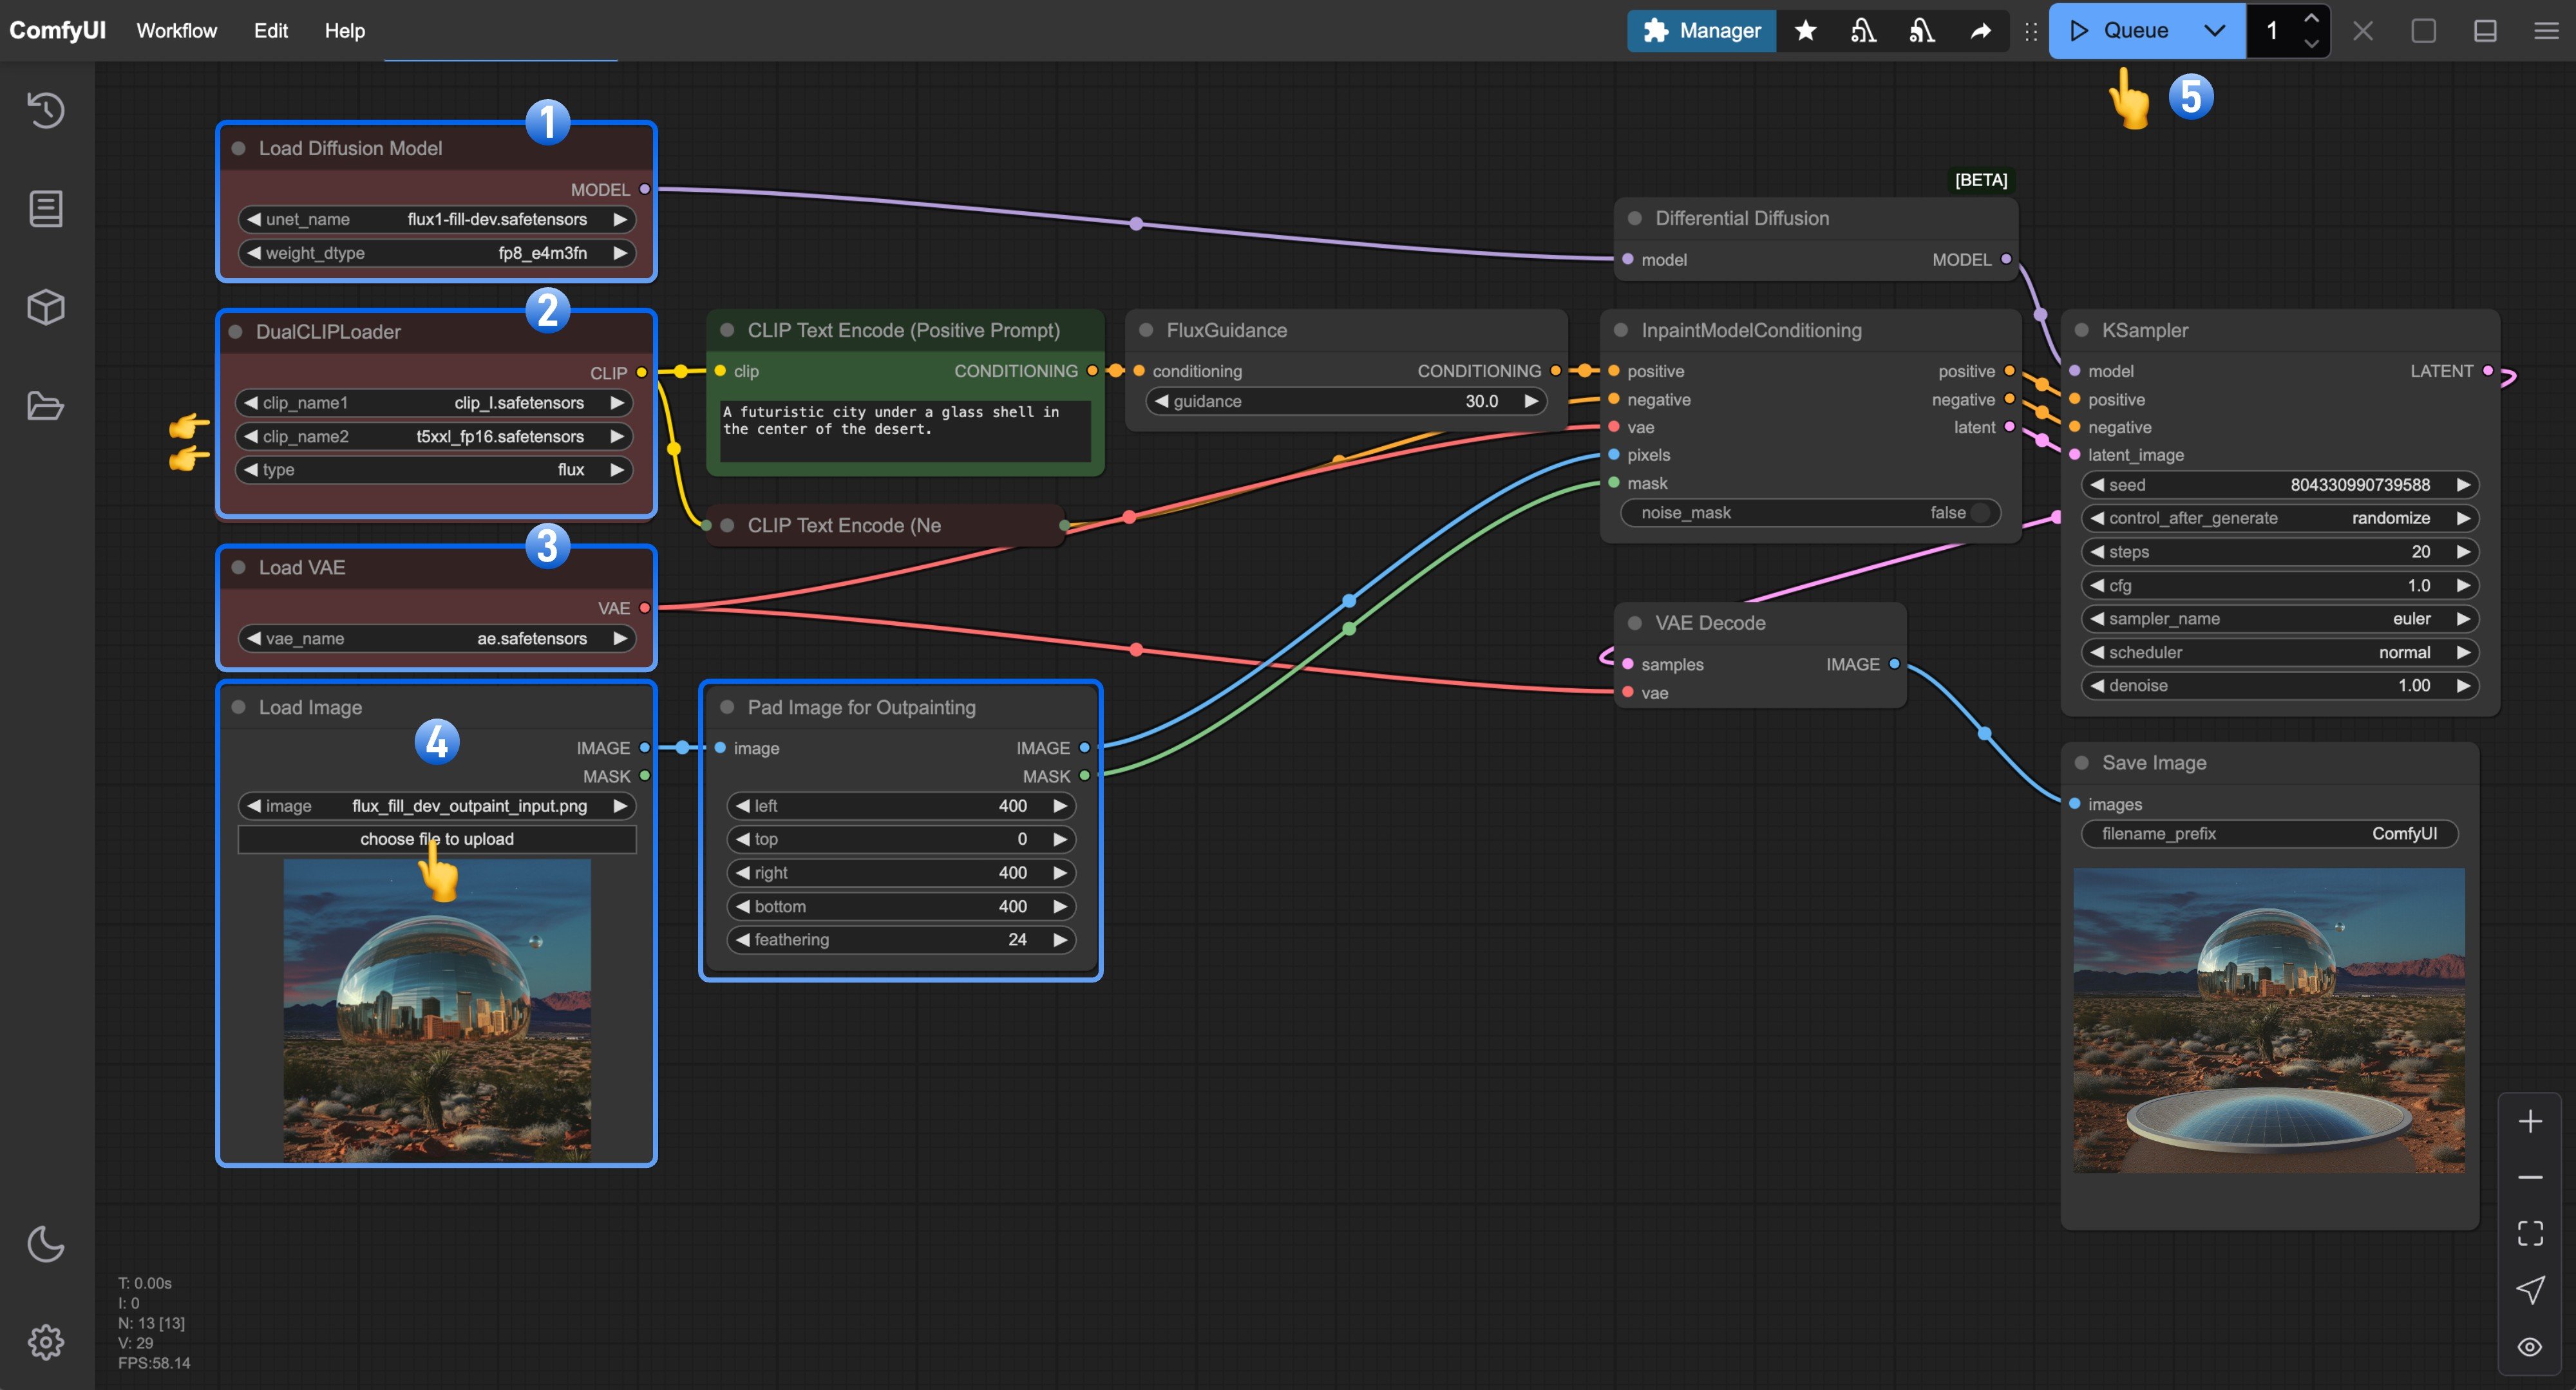 1. 确保 `Load Diffusion Model` 节点已加载 `flux1-fill-dev.safetensors`。
2. 确保 `DualCLIPLoader` 节点已加载以下模型:
* clip\_name1: `t5xxl_fp16.safetensors`
* clip\_name2: `clip_l.safetensors`
3. 确保 `Load VAE` 节点已加载 `ae.safetensors`。
4. 将文档中提供的输入图像上传到 `Load Image` 节点。
5. 点击 `Queue` 按钮,或使用快捷键 `Ctrl(cmd) + Enter` 运行工作流。
1. 确保 `Load Diffusion Model` 节点已加载 `flux1-fill-dev.safetensors`。
2. 确保 `DualCLIPLoader` 节点已加载以下模型:
* clip\_name1: `t5xxl_fp16.safetensors`
* clip\_name2: `clip_l.safetensors`
3. 确保 `Load VAE` 节点已加载 `ae.safetensors`。
4. 将文档中提供的输入图像上传到 `Load Image` 节点。
5. 点击 `Queue` 按钮,或使用快捷键 `Ctrl(cmd) + Enter` 运行工作流。