> ## Documentation Index
> Fetch the complete documentation index at: https://dripart-docs-robin-i18n-sync.mintlify.site/llms.txt
> Use this file to discover all available pages before exploring further.
# ComfyUI Flux.1 fill dev の使用例
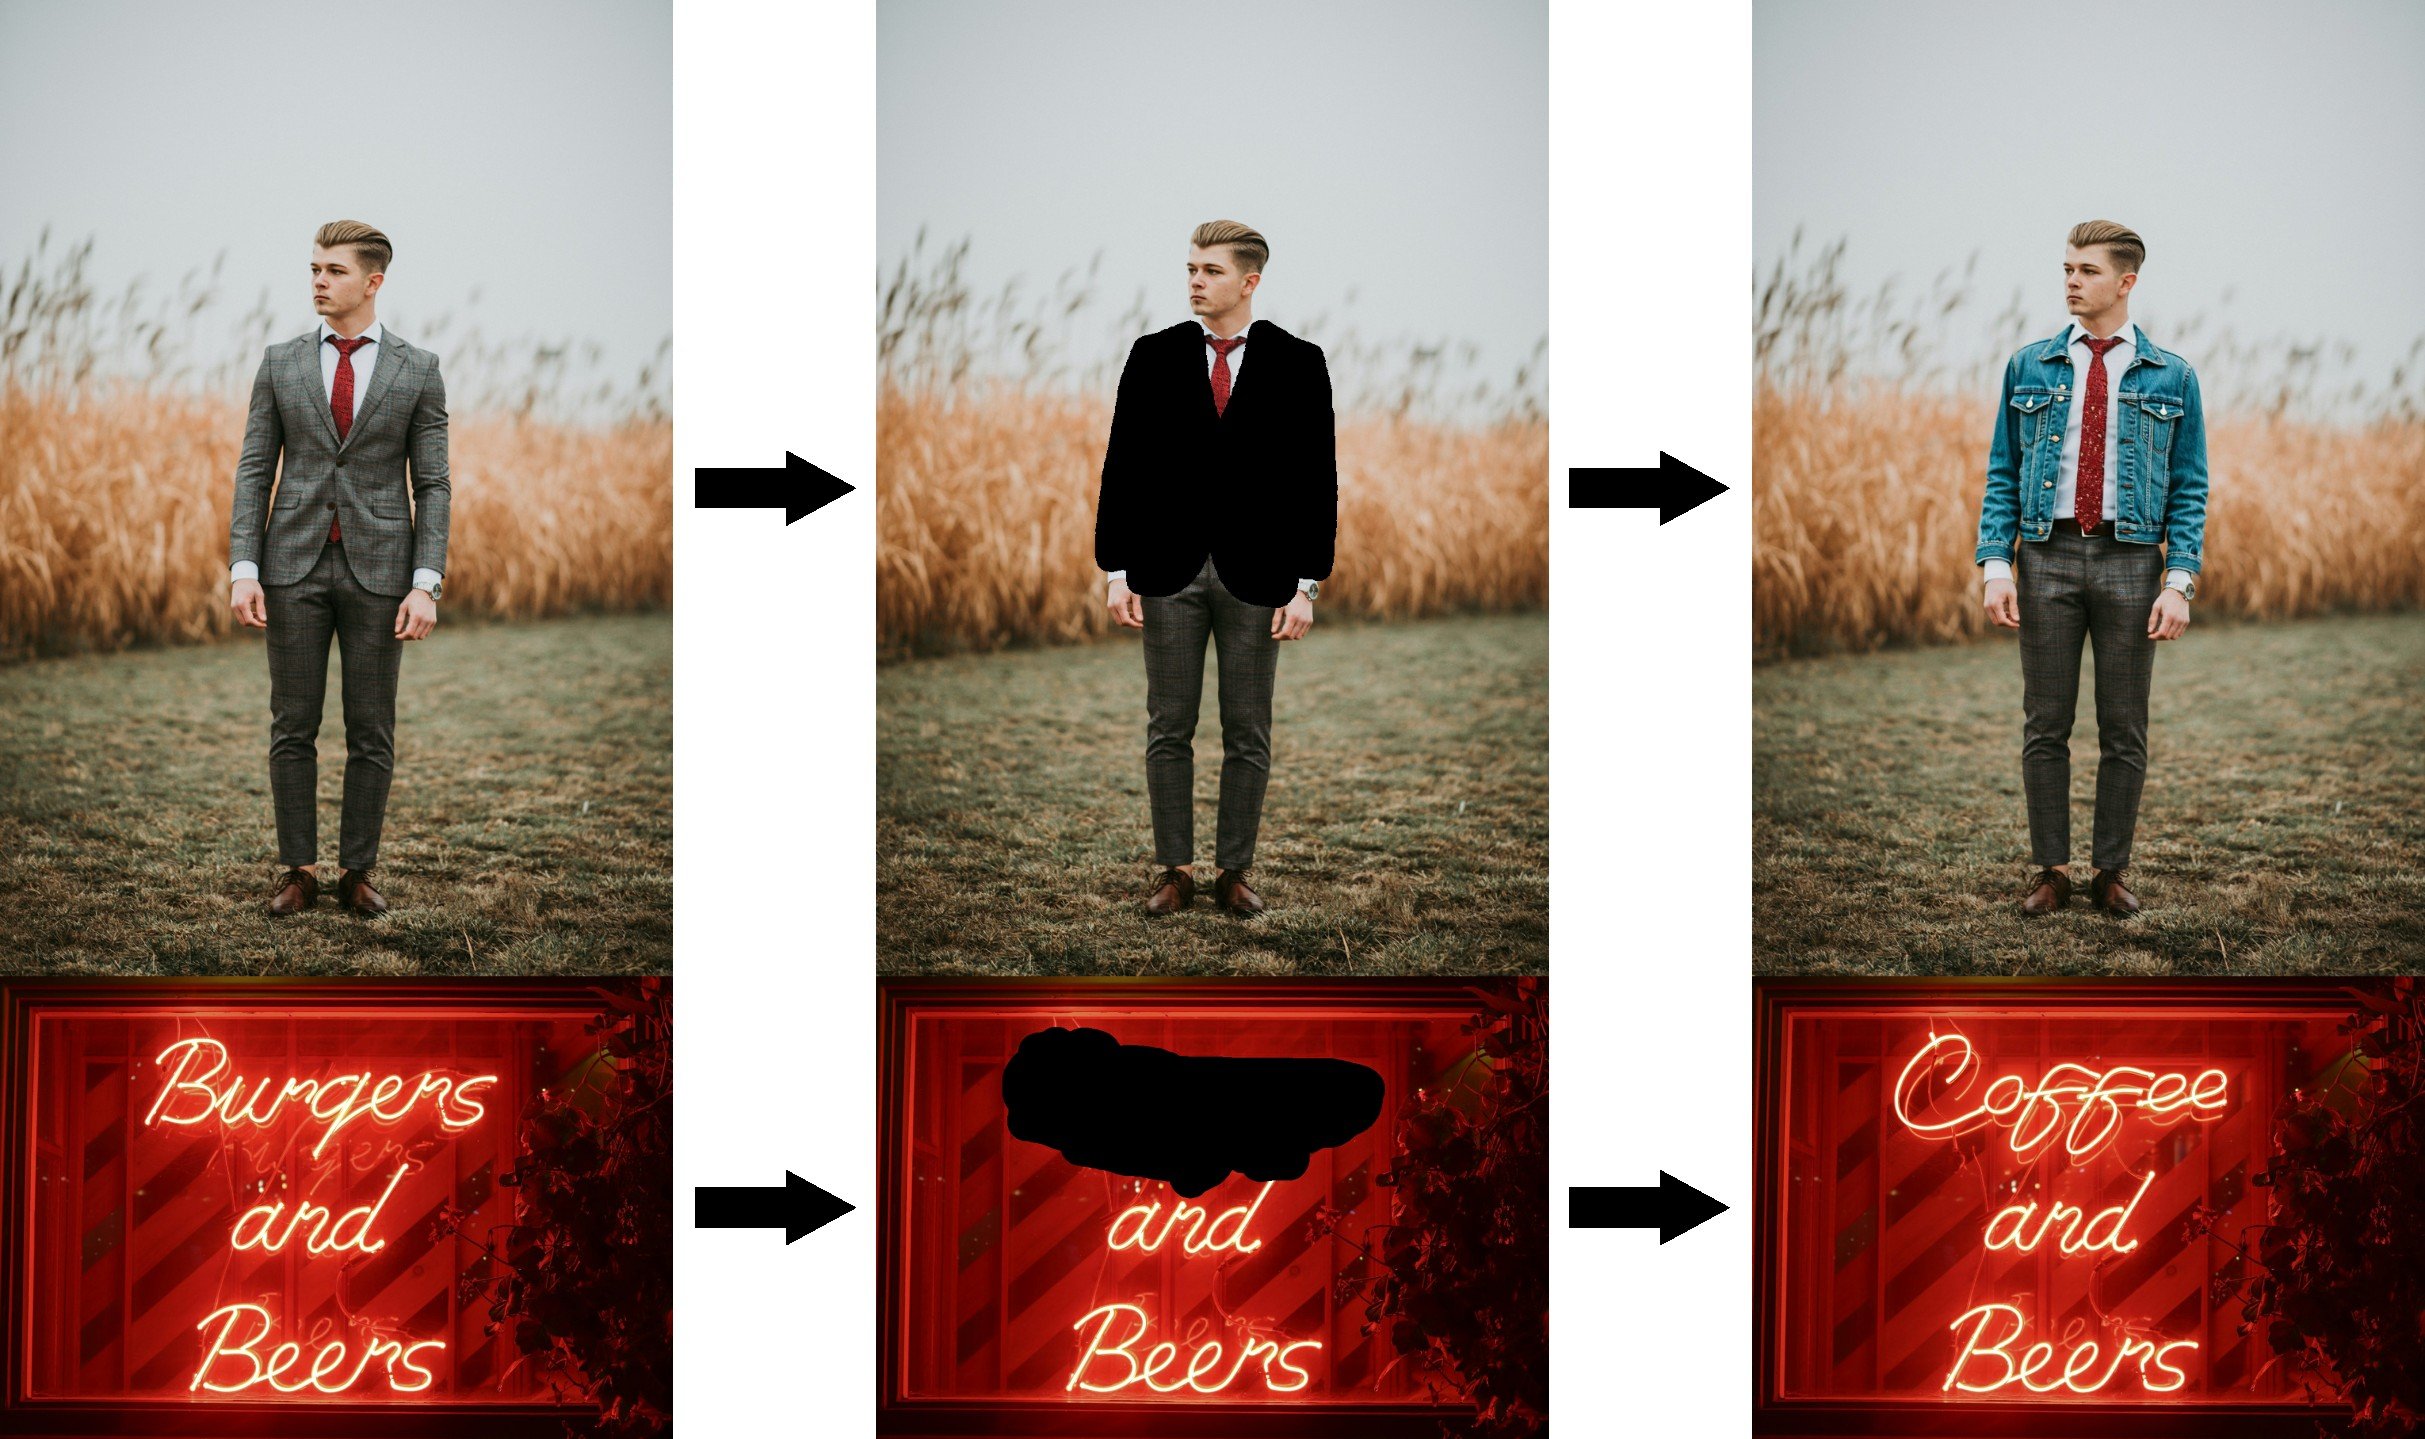
> 本ガイドでは、Flux.1 fill dev を用いた Inpainting(画像修復)および Outpainting(画像拡張)ワークフローの構築方法を解説します。
 ## Flux.1 fill dev モデルの概要
Flux.1 fill dev は、[Black Forest Labs](https://blackforestlabs.ai/) が提供する [FLUX.1 Tools スイート](https://blackforestlabs.ai/flux-1-tools/) の中核をなすツールの一つであり、画像の Inpainting(修復)および Outpainting(拡張)に特化して設計されています。
Flux.1 fill dev の主な特長:
* 強力な画像修復および画像拡張機能を備えており、その生成品質は商用版 FLUX.1 Fill \[pro] に次ぐ水準です。
* プロンプトの理解と実行能力に優れ、ユーザーの意図を正確に捉えつつ、元画像との高い一貫性を維持します。
* 先進的な「ガイド付き蒸留学習(guided distillation training)」技術を採用しており、高品質な出力を維持しつつモデルの効率性を向上させています。
* 利用条件が親しみやすく、生成された出力は個人利用、学術研究、商業利用のいずれにも適用可能です。詳細については、[FLUX.1 \[dev\] 非商用ライセンス](https://huggingface.co/black-forest-labs/FLUX.1-dev/blob/main/LICENSE.md) をご確認ください。
オープンソースリポジトリ:[FLUX.1 \[dev\]](https://huggingface.co/black-forest-labs/FLUX.1-dev)
本ガイドでは、Flux.1 fill dev モデルを用いた Inpainting および Outpainting のワークフローを実際に構築・実行します。\
Inpainting や Outpainting のワークフローについてまだご存じない場合は、関連する解説を参照するために、[ComfyUI レイアウト Inpainting の使用例](/ja/tutorials/basic/inpaint) および [ComfyUI 画像拡張の使用例](/ja/tutorials/basic/outpaint) をご覧ください。
## Flux.1 Fill dev および関連モデルのインストール
開始に先立ち、Flux.1 Fill dev モデルファイルのインストールを完了しましょう。Inpainting および Outpainting の両ワークフローで、完全に同一のモデルファイルを使用します。\
以前に [Flux.1 Text-to-Image ワークフロー](/ja/tutorials/flux/flux-1-text-to-image) のフルバージョンをご利用済みの場合、本セクションでは **`flux1-fill-dev.safetensors`** のみをダウンロードすれば十分です。
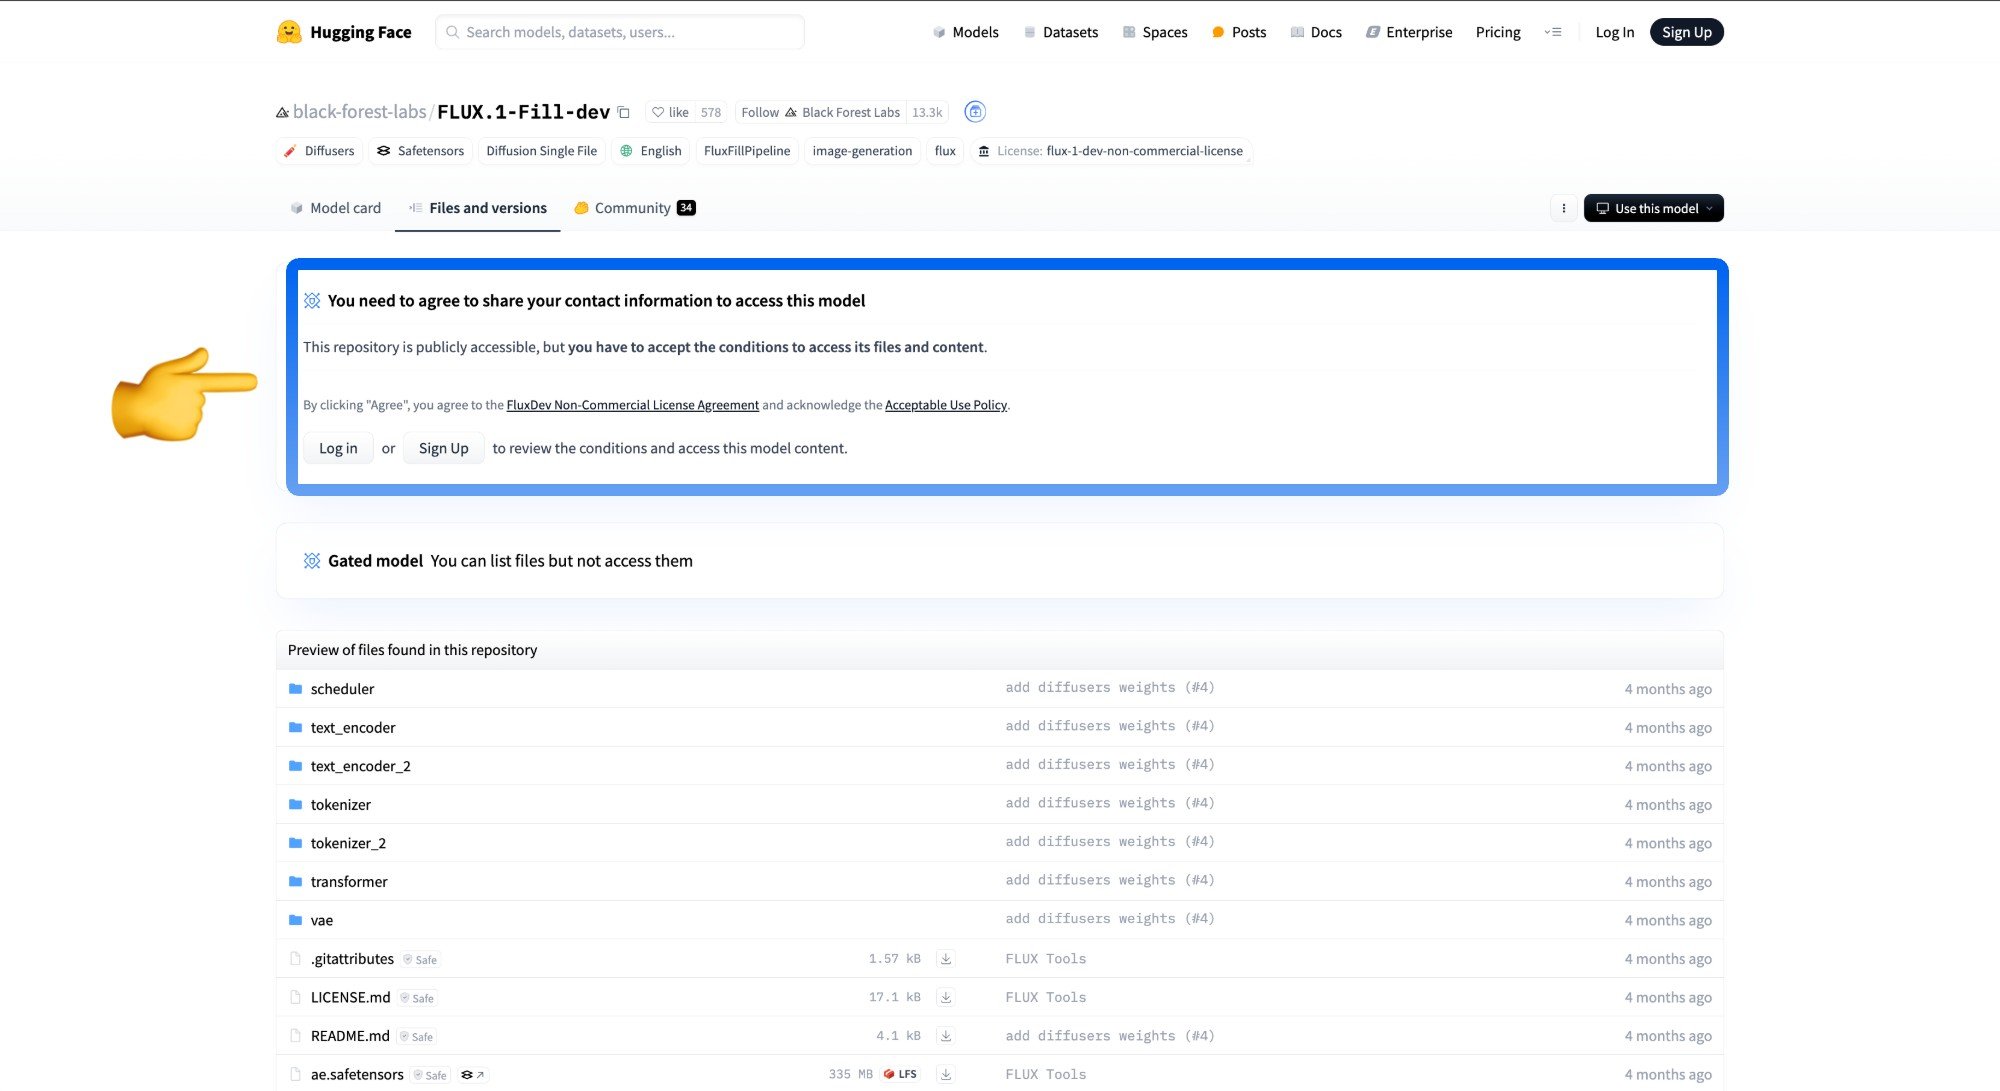
ただし、対応するモデルをダウンロードするには、当該利用規約への同意が必要です。そのため、[black-forest-labs/FLUX.1-Fill-dev](https://huggingface.co/black-forest-labs/FLUX.1-Fill-dev) のページへアクセスし、下図に示す通り、利用規約に同意済みであることを確認してください。\\
## Flux.1 fill dev モデルの概要
Flux.1 fill dev は、[Black Forest Labs](https://blackforestlabs.ai/) が提供する [FLUX.1 Tools スイート](https://blackforestlabs.ai/flux-1-tools/) の中核をなすツールの一つであり、画像の Inpainting(修復)および Outpainting(拡張)に特化して設計されています。
Flux.1 fill dev の主な特長:
* 強力な画像修復および画像拡張機能を備えており、その生成品質は商用版 FLUX.1 Fill \[pro] に次ぐ水準です。
* プロンプトの理解と実行能力に優れ、ユーザーの意図を正確に捉えつつ、元画像との高い一貫性を維持します。
* 先進的な「ガイド付き蒸留学習(guided distillation training)」技術を採用しており、高品質な出力を維持しつつモデルの効率性を向上させています。
* 利用条件が親しみやすく、生成された出力は個人利用、学術研究、商業利用のいずれにも適用可能です。詳細については、[FLUX.1 \[dev\] 非商用ライセンス](https://huggingface.co/black-forest-labs/FLUX.1-dev/blob/main/LICENSE.md) をご確認ください。
オープンソースリポジトリ:[FLUX.1 \[dev\]](https://huggingface.co/black-forest-labs/FLUX.1-dev)
本ガイドでは、Flux.1 fill dev モデルを用いた Inpainting および Outpainting のワークフローを実際に構築・実行します。\
Inpainting や Outpainting のワークフローについてまだご存じない場合は、関連する解説を参照するために、[ComfyUI レイアウト Inpainting の使用例](/ja/tutorials/basic/inpaint) および [ComfyUI 画像拡張の使用例](/ja/tutorials/basic/outpaint) をご覧ください。
## Flux.1 Fill dev および関連モデルのインストール
開始に先立ち、Flux.1 Fill dev モデルファイルのインストールを完了しましょう。Inpainting および Outpainting の両ワークフローで、完全に同一のモデルファイルを使用します。\
以前に [Flux.1 Text-to-Image ワークフロー](/ja/tutorials/flux/flux-1-text-to-image) のフルバージョンをご利用済みの場合、本セクションでは **`flux1-fill-dev.safetensors`** のみをダウンロードすれば十分です。
ただし、対応するモデルをダウンロードするには、当該利用規約への同意が必要です。そのため、[black-forest-labs/FLUX.1-Fill-dev](https://huggingface.co/black-forest-labs/FLUX.1-Fill-dev) のページへアクセスし、下図に示す通り、利用規約に同意済みであることを確認してください。\\
 必要なモデル一覧:
* [clip\_l.safetensors](https://huggingface.co/comfyanonymous/flux_text_encoders/resolve/main/clip_l.safetensors?download=true)
* [t5xxl\_fp16.safetensors](https://huggingface.co/comfyanonymous/flux_text_encoders/resolve/main/t5xxl_fp16.safetensors?download=true)
* [ae.safetensors](https://huggingface.co/black-forest-labs/FLUX.1-schnell/resolve/main/ae.safetensors?download=true)
* [flux1-fill-dev.safetensors](https://huggingface.co/black-forest-labs/FLUX.1-Fill-dev/resolve/main/flux1-fill-dev.safetensors?download=true)
ファイルの保存場所:
```
ComfyUI/
├── models/
│ ├── text_encoders/
│ │ ├── clip_l.safetensors
│ │ └── t5xxl_fp16.safetensors
│ ├── vae/
│ │ └── ae.safetensors
│ └── diffusion_models/
│ └── flux1-fill-dev.safetensors
```
## Flux.1 Fill dev を用いた Inpainting ワークフロー
必要なモデル一覧:
* [clip\_l.safetensors](https://huggingface.co/comfyanonymous/flux_text_encoders/resolve/main/clip_l.safetensors?download=true)
* [t5xxl\_fp16.safetensors](https://huggingface.co/comfyanonymous/flux_text_encoders/resolve/main/t5xxl_fp16.safetensors?download=true)
* [ae.safetensors](https://huggingface.co/black-forest-labs/FLUX.1-schnell/resolve/main/ae.safetensors?download=true)
* [flux1-fill-dev.safetensors](https://huggingface.co/black-forest-labs/FLUX.1-Fill-dev/resolve/main/flux1-fill-dev.safetensors?download=true)
ファイルの保存場所:
```
ComfyUI/
├── models/
│ ├── text_encoders/
│ │ ├── clip_l.safetensors
│ │ └── t5xxl_fp16.safetensors
│ ├── vae/
│ │ └── ae.safetensors
│ └── diffusion_models/
│ └── flux1-fill-dev.safetensors
```
## Flux.1 Fill dev を用いた Inpainting ワークフロー
Flux.1 Inpaint
Flux.1 Fill Inpainting を使用して、画像の不足している部分を埋めます。
 Comfy Cloud で開く
JSON をダウンロードするか、テンプレートライブラリで "Flux.1 Inpaint" を検索してください
**入力素材**
このファイルを対応する `LoadImage` ノードにアップロードしてください:
`LoadImage` ノード 17 · `flux_fill_inpaint_example_input_image.png`
**出力例**
### 1. Inpainting ワークフローとアセット
対応する画像には既にアルファチャンネルが含まれているため、別途マスクを描画する必要はありません。
独自のマスクを描画したい場合は、[こちらをクリック](https://raw.githubusercontent.com/Comfy-Org/example_workflows/main/flux/inpaint/flux_fill_inpaint_input_original.png) してマスクなしの画像を取得し、[ComfyUI レイアウト Inpainting の使用例](/ja/tutorials/basic/inpaint#マスクエディタの使用方法) の MaskEditor の使用方法セクションを参照して、`Load Image` ノードでマスクを描画する方法を学んでください。
### 2. ワークフローの実行手順
Comfy Cloud で開く
JSON をダウンロードするか、テンプレートライブラリで "Flux.1 Inpaint" を検索してください
**入力素材**
このファイルを対応する `LoadImage` ノードにアップロードしてください:
`LoadImage` ノード 17 · `flux_fill_inpaint_example_input_image.png`
**出力例**
### 1. Inpainting ワークフローとアセット
対応する画像には既にアルファチャンネルが含まれているため、別途マスクを描画する必要はありません。
独自のマスクを描画したい場合は、[こちらをクリック](https://raw.githubusercontent.com/Comfy-Org/example_workflows/main/flux/inpaint/flux_fill_inpaint_input_original.png) してマスクなしの画像を取得し、[ComfyUI レイアウト Inpainting の使用例](/ja/tutorials/basic/inpaint#マスクエディタの使用方法) の MaskEditor の使用方法セクションを参照して、`Load Image` ノードでマスクを描画する方法を学んでください。
### 2. ワークフローの実行手順
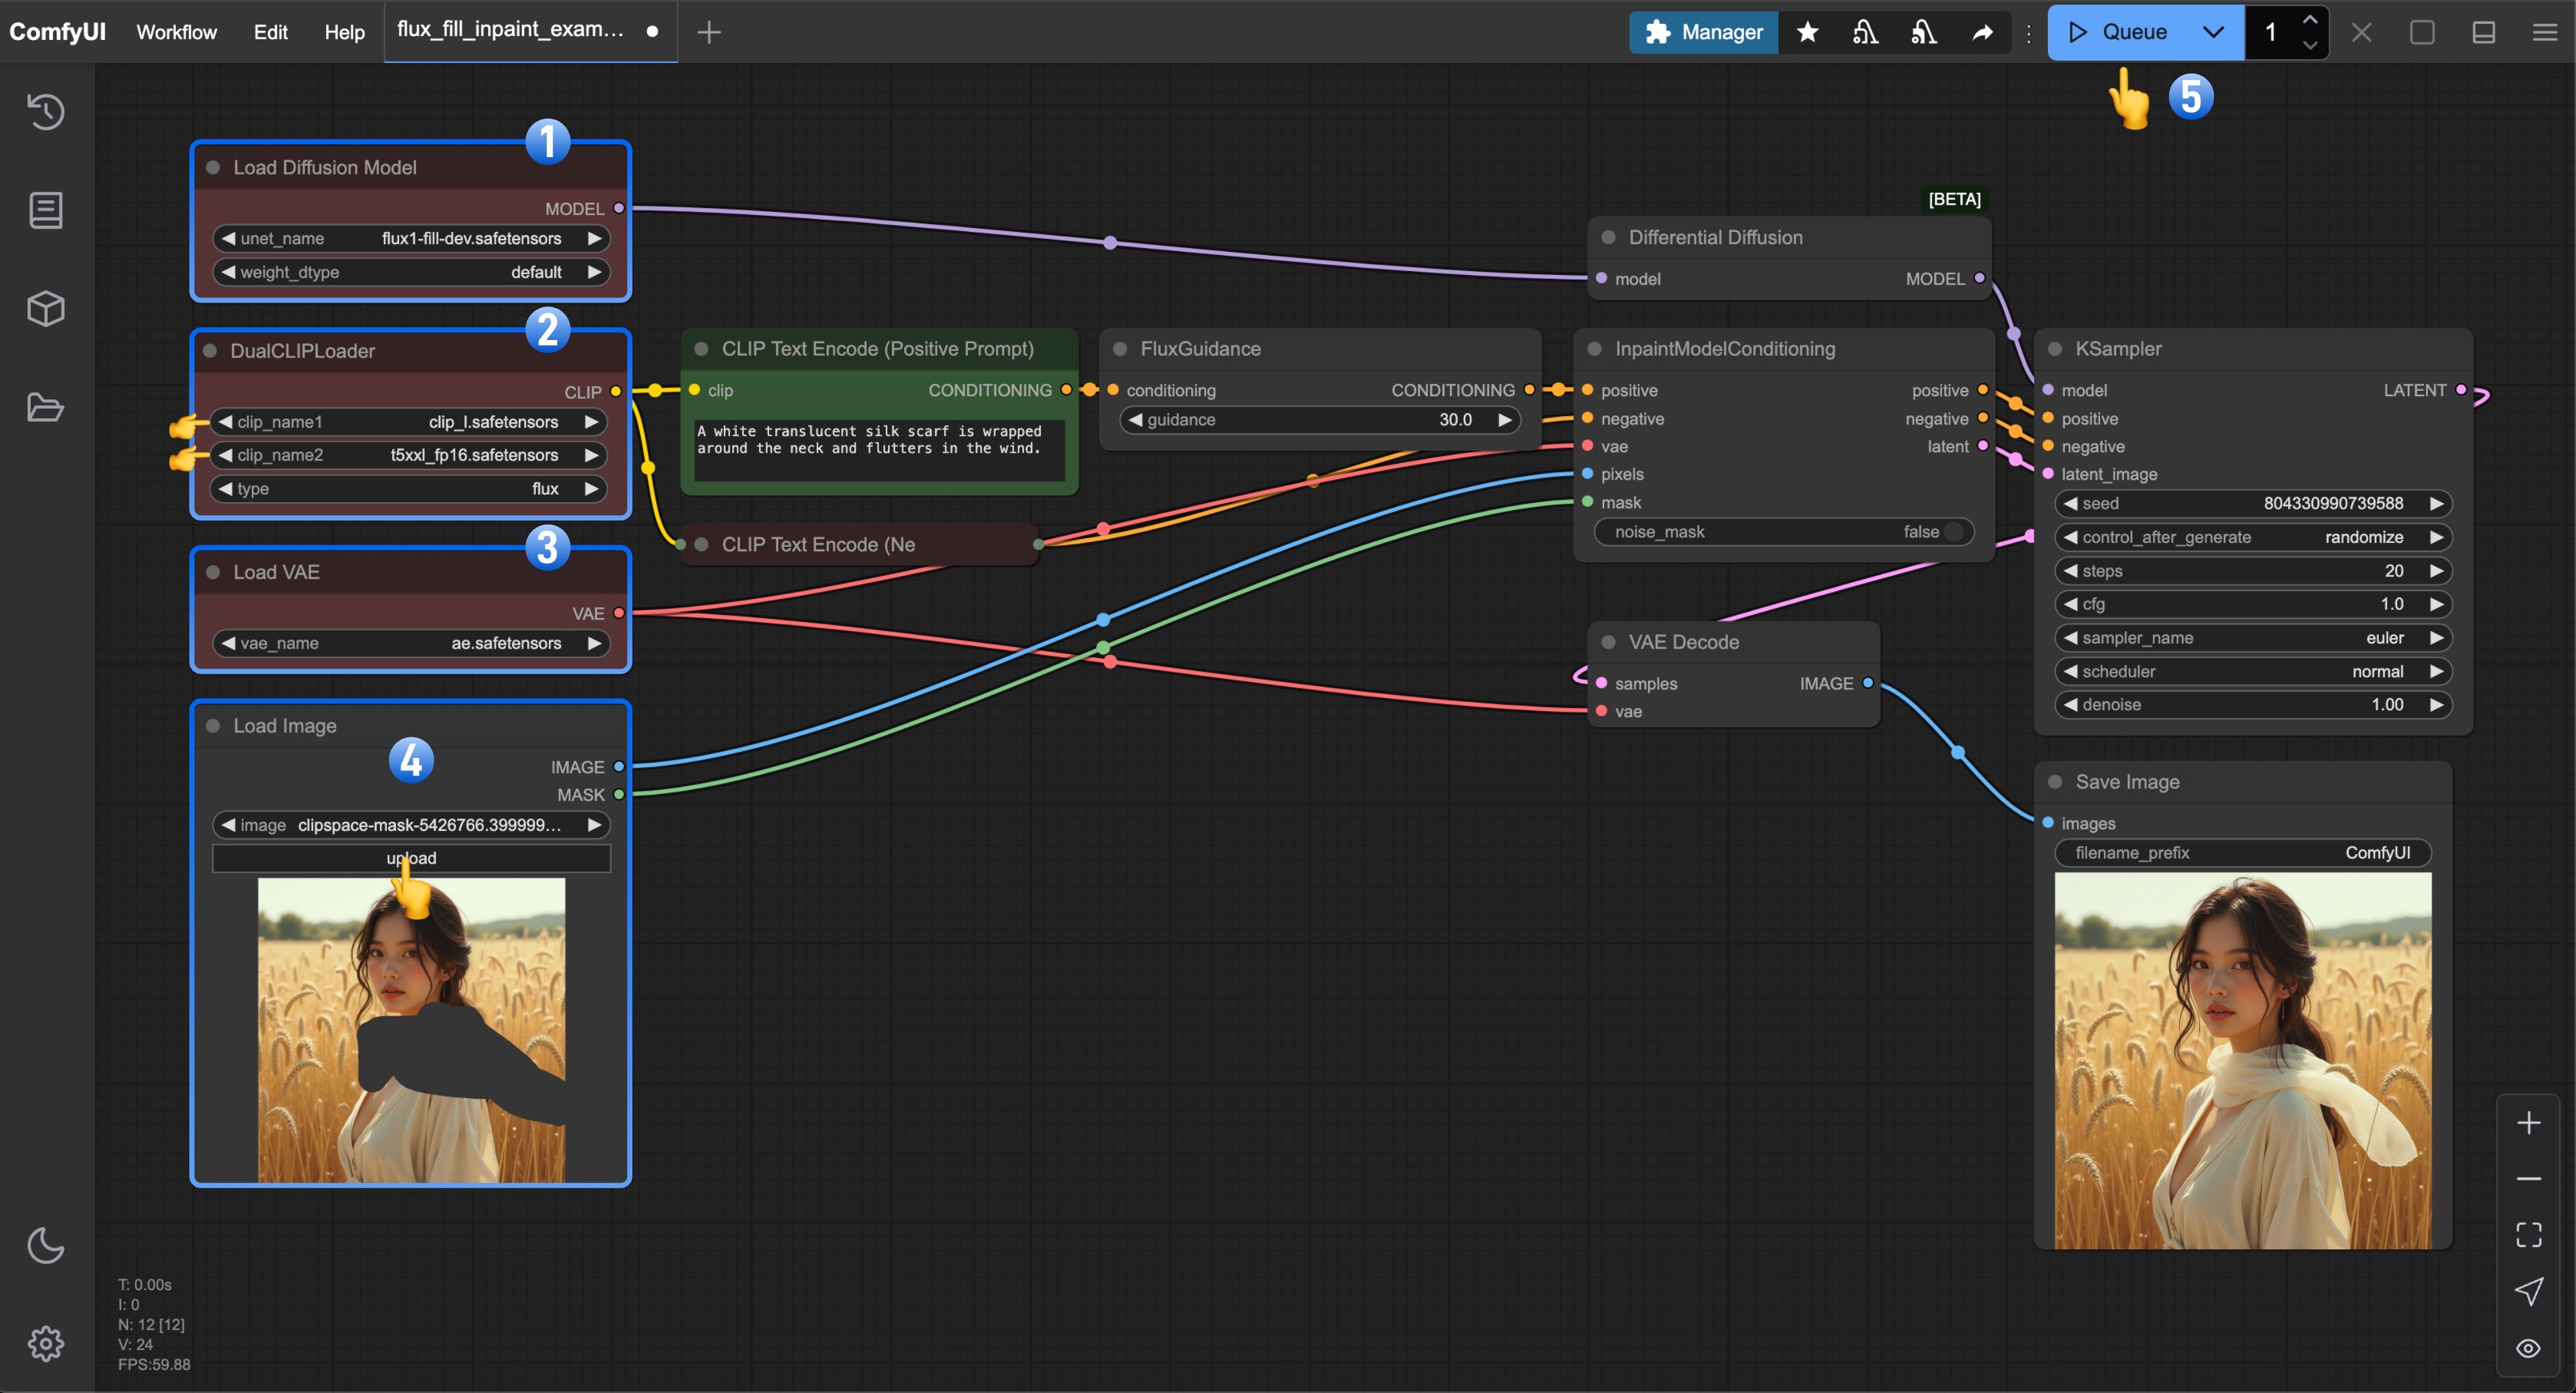 1. `Load Diffusion Model` ノードに `flux1-fill-dev.safetensors` が正しく読み込まれていることを確認します。
2. `DualCLIPLoader` ノードに以下のモデルが読み込まれていることを確認します:
* clip\_name1: `t5xxl_fp16.safetensors`
* clip\_name2: `clip_l.safetensors`
3. `Load VAE` ノードに `ae.safetensors` が正しく読み込まれていることを確認します。
4. 本文書で提供される入力画像を `Load Image` ノードへアップロードします。マスクなしのバージョンを使用する場合は、必ずマスクエディターを使用してマスクの描画を完了させてください。
5. `Queue` ボタンをクリックするか、ショートカットキー `Ctrl(cmd) + Enter` を使用してワークフローを実行します。
## Flux.1 Fill dev Outpainting ワークフロー
1. `Load Diffusion Model` ノードに `flux1-fill-dev.safetensors` が正しく読み込まれていることを確認します。
2. `DualCLIPLoader` ノードに以下のモデルが読み込まれていることを確認します:
* clip\_name1: `t5xxl_fp16.safetensors`
* clip\_name2: `clip_l.safetensors`
3. `Load VAE` ノードに `ae.safetensors` が正しく読み込まれていることを確認します。
4. 本文書で提供される入力画像を `Load Image` ノードへアップロードします。マスクなしのバージョンを使用する場合は、必ずマスクエディターを使用してマスクの描画を完了させてください。
5. `Queue` ボタンをクリックするか、ショートカットキー `Ctrl(cmd) + Enter` を使用してワークフローを実行します。
## Flux.1 Fill dev Outpainting ワークフロー
Flux.1 Outpaint
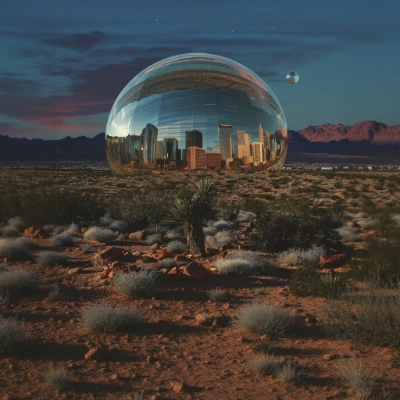
Flux.1 の Outpainting を使用して、画像を境界の外側まで拡張します。
 Comfy Cloud で開く
JSON をダウンロードするか、テンプレートライブラリで「Flux.1 Outpaint」を検索してください
**入力素材**
このファイルを対応する `LoadImage` ノードにアップロードします:
`LoadImage` ノード 17 · `flux_fill_outpaint_example_input_image.png`
### 1. Outpainting ワークフローとアセット
### 2. ワークフローの実行手順
Comfy Cloud で開く
JSON をダウンロードするか、テンプレートライブラリで「Flux.1 Outpaint」を検索してください
**入力素材**
このファイルを対応する `LoadImage` ノードにアップロードします:
`LoadImage` ノード 17 · `flux_fill_outpaint_example_input_image.png`
### 1. Outpainting ワークフローとアセット
### 2. ワークフローの実行手順
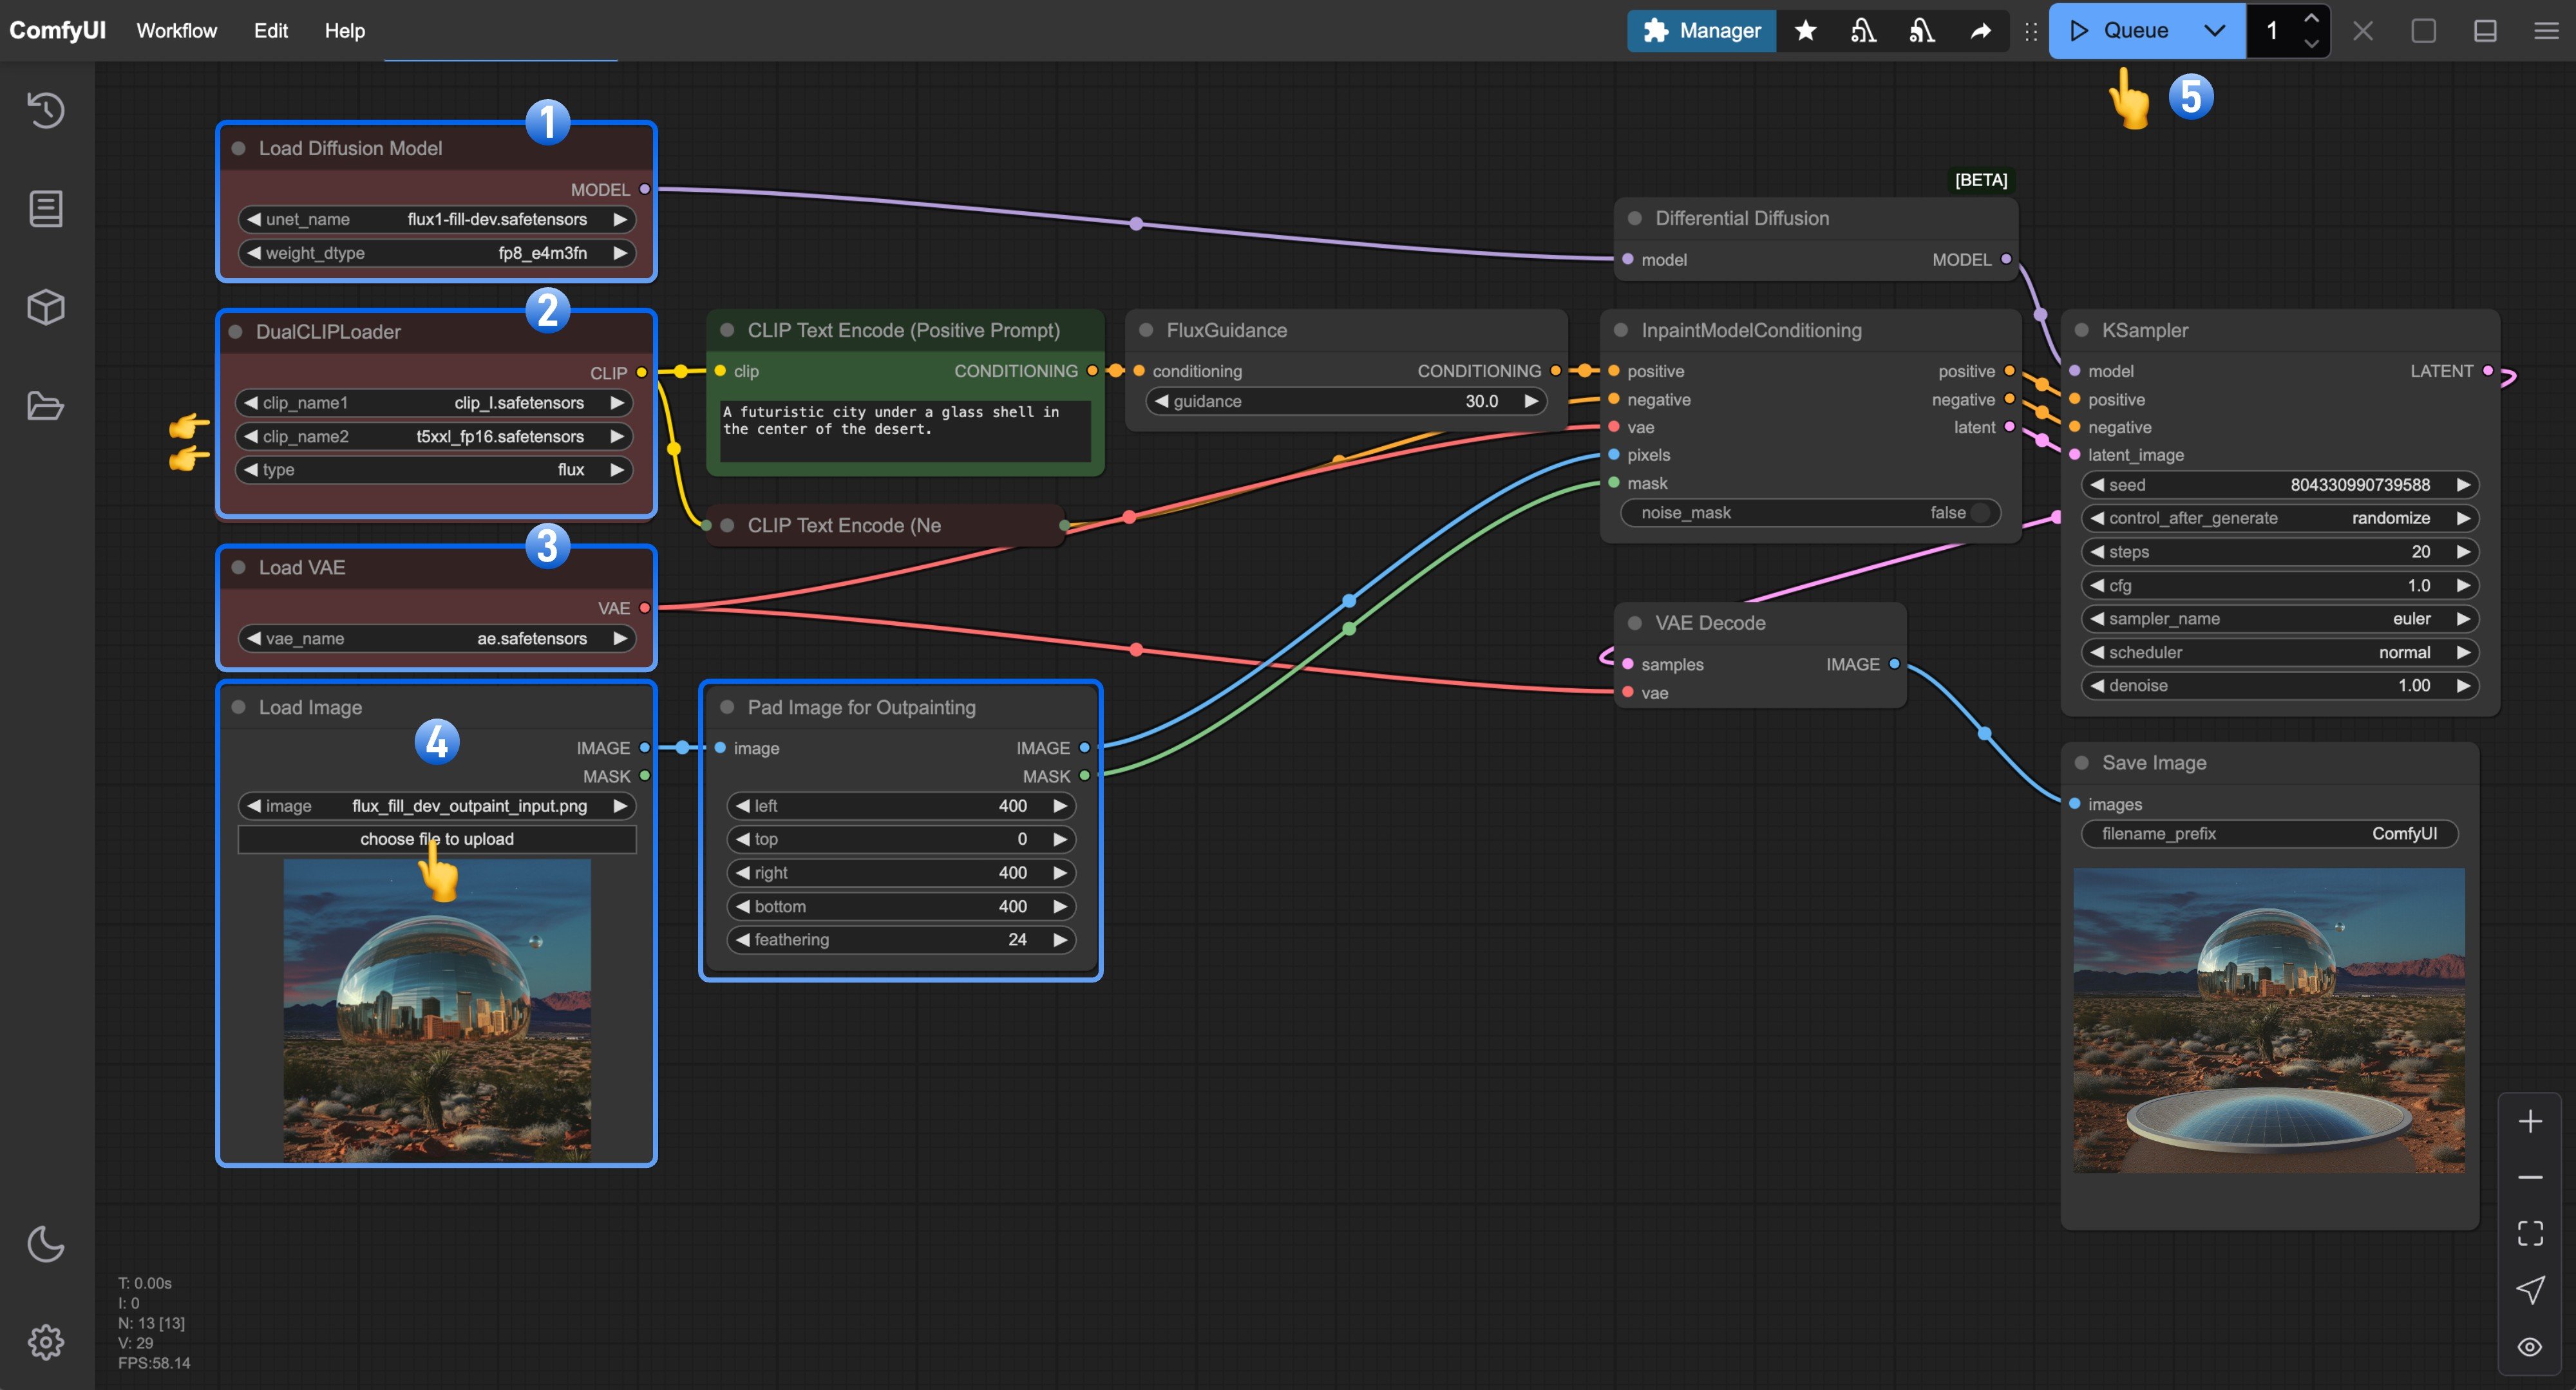 1. `Load Diffusion Model` ノードに `flux1-fill-dev.safetensors` が読み込まれていることを確認します。
2. `DualCLIPLoader` ノードに以下のモデルが読み込まれていることを確認します:
* clip\_name1: `t5xxl_fp16.safetensors`
* clip\_name2: `clip_l.safetensors`
3. `Load VAE` ノードに `ae.safetensors` が読み込まれていることを確認します。
4. 本文書で提供されている入力画像を `Load Image` ノードにアップロードします。
5. `Queue` ボタンをクリックするか、ショートカットキー `Ctrl(cmd) + Enter` を使用してワークフローを実行します。
1. `Load Diffusion Model` ノードに `flux1-fill-dev.safetensors` が読み込まれていることを確認します。
2. `DualCLIPLoader` ノードに以下のモデルが読み込まれていることを確認します:
* clip\_name1: `t5xxl_fp16.safetensors`
* clip\_name2: `clip_l.safetensors`
3. `Load VAE` ノードに `ae.safetensors` が読み込まれていることを確認します。
4. 本文書で提供されている入力画像を `Load Image` ノードにアップロードします。
5. `Queue` ボタンをクリックするか、ショートカットキー `Ctrl(cmd) + Enter` を使用してワークフローを実行します。